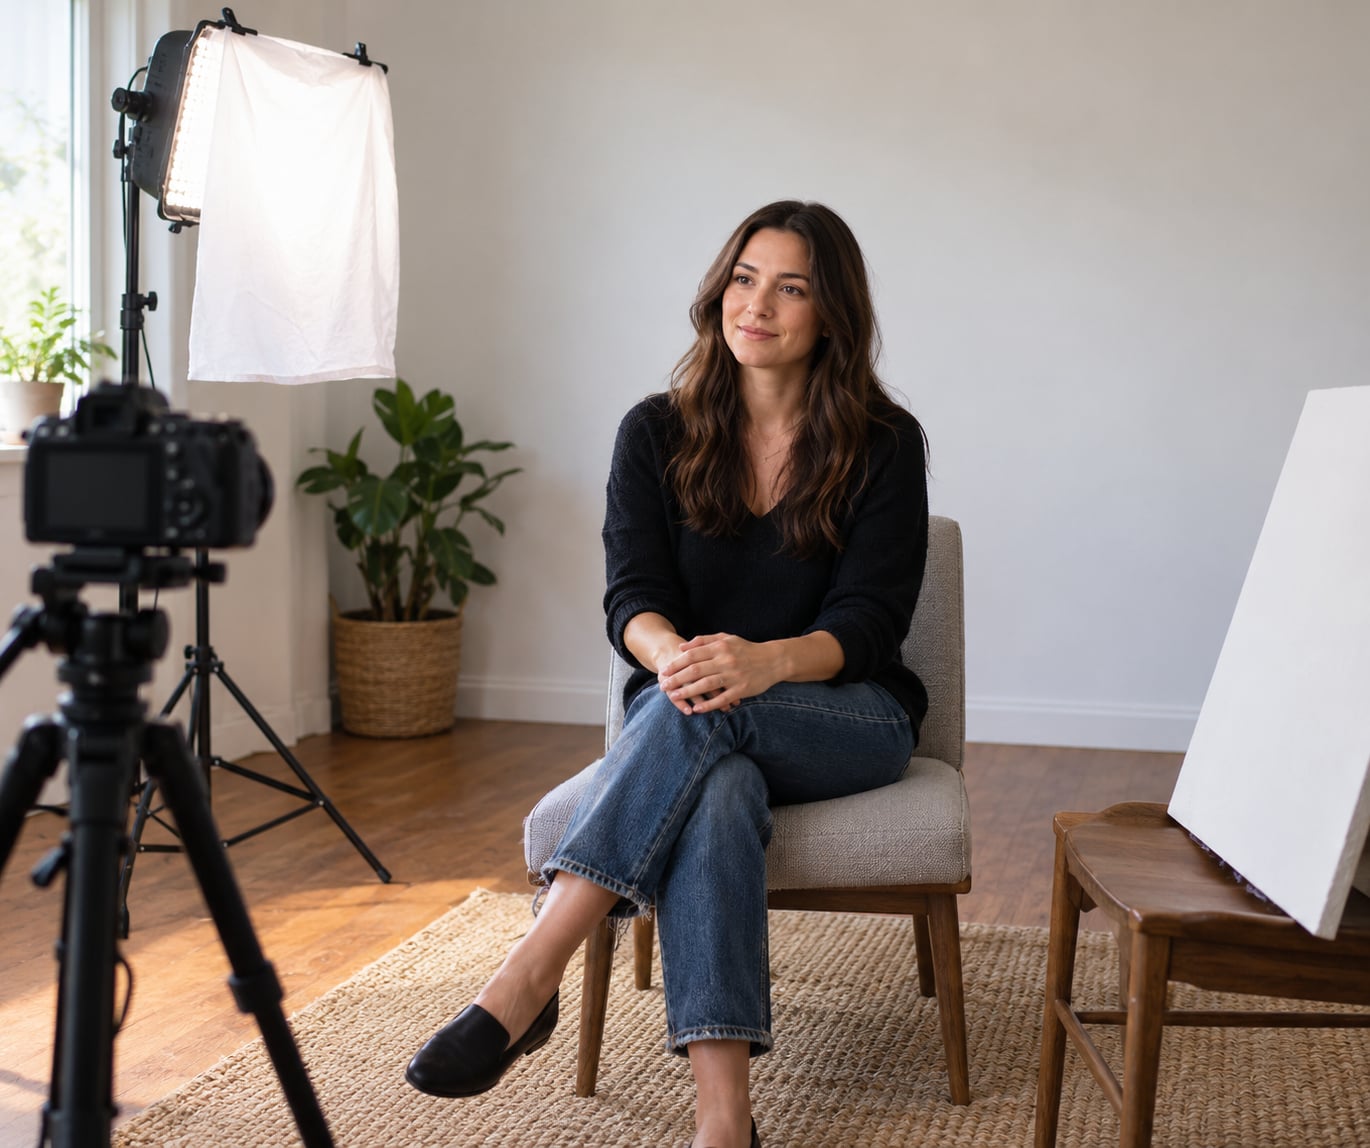
If you want to know how to light an interview with cheap gear, put one softened light close to the camera at roughly 45 degrees, add a white foam board on the shadow side, switch off every other light in the room, and record a ten-second test before you start. That single light plus bounce takes about fifteen minutes to build and works in an ordinary room with gear you probably already own.
I shoot short interviews for newsroom and comms clients, and the same pattern repeats: flat, hard or mismatched light is the first thing viewers notice, and it is the hardest thing an editor can fix afterwards. Where a light sits matters far more than what it cost.
All interview lighting comes down to three jobs. One light shapes the face, one lifts the shadow side so you control contrast, and one separates the subject from the background. Cheap setups simply borrow household objects for the second and third job.
Table of Contents
- What You Need
- Step-by-Step: How to Light an Interview with Cheap Gear
- Frequently Asked Questions
- Can I light an interview with one cheap light?
- What is the cheapest way to improve interview lighting?
- Is window light good enough for an interview?
- How do I avoid harsh shadows with one light?
- Should the background be brighter or darker than the subject?
- How do I make cheap lighting look professional on camera?
- Conclusion
What You Need
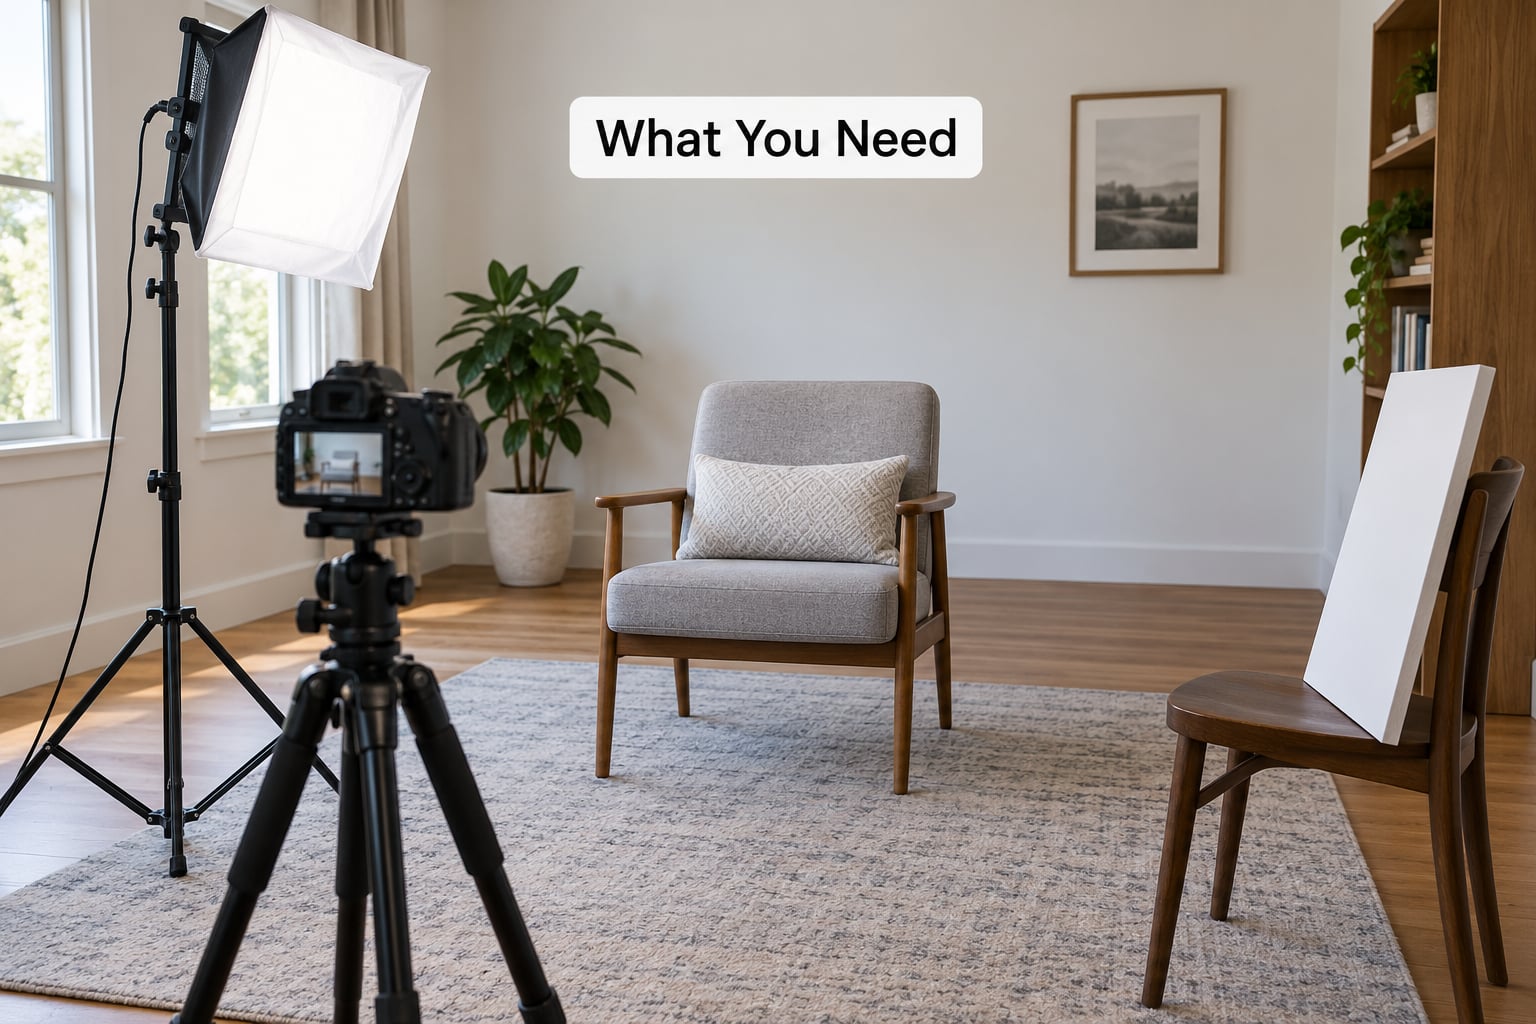
You can get a genuinely good result with a camera you already have, one continuous light, something translucent to hang in front of it, and a flat white surface to bounce off. Everything beyond that is optional and, honestly, later.
The essentials:
- A camera. A phone held in landscape shoots a perfectly acceptable interview. A mirrorless or DSLR body with a fast prime is nicer, but the lighting rules do not change.
- One key light. A daylight-balanced LED panel or a single COB light does the work. Daylight balanced means it sits around 5600K, which matches most windows and most cameras set to daylight.
- Something to soften it. A white bed sheet, an opaque shower curtain, a paper lantern or a cheap silk all work. If the shadow edge on your subject’s face is crisp, the source is too small.
- A white reflector. A piece of white foam board, a sheet of poster board, or a 5-in-1 reflector propped on a chair. This is your fill.
- Something to hold it up. A C-stand with a turtle base is the workhorse; a clamp on a shelf or a heavy stack of books does the job in a pinch. Sandbags, or a bag of rice on the base, stop a light tipping over mid-interview.
- Room preparation. Clear clutter from behind the subject, keep the soft furnishings in the room for sound, and switch off ceiling lights and lamps.
Worth adding only once the basics are repeatable: a second light to use as fill or as a background wash, black cardstock or a dark towel for negative fill, a CTO gel if your light is tungsten balanced, and a small clamp-on lamp to lift the background.
A few terms worth knowing before you start:
- Key light – the light doing the main shaping work on the face.
- Fill light – light added only to soften the shadow side, never to make it brighter than the key.
- Back light, hair light or edge light – a light placed behind and above the subject to draw a bright line along the shoulders and separate them from the background.
- Negative fill – putting something black on the fill side instead of white, which deepens the shadow and adds contrast deliberately.
- Key to fill ratio – the brightness difference between the two sides of the face. About 2:1 reads as natural for a talking head; 4:1 looks dramatic and hides less skin texture.
- Colour temperature – measured in kelvin. Around 3200K is warm and orange, around 5600K is cool and neutral. Mix the two and the face goes patchy.
Buy in one order: camera and microphone, then the key light and its stand, then the reflector and diffusion, then sandbags, then the second light, and only then effects. Buying a second light before the first is on a proper stand is the classic budget mistake, because it will sit on a desk and point at a ceiling.
Step-by-Step: How to Light an Interview with Cheap Gear
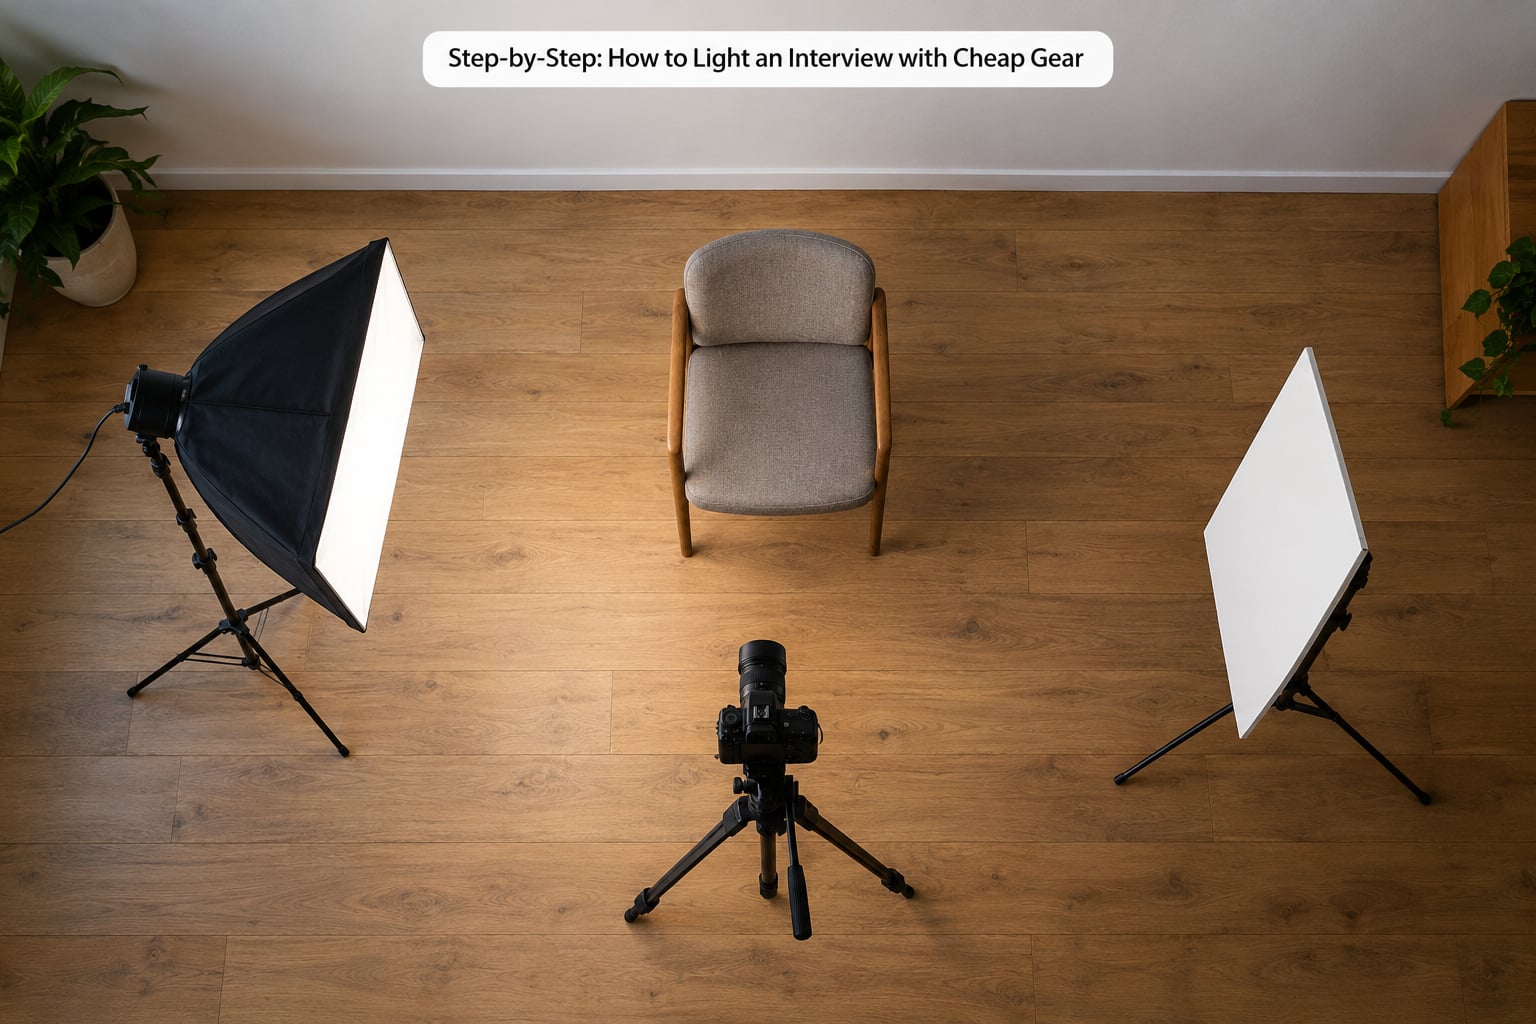
Work through these in order. Each step is quick, and each one changes the look more than you would expect.
- Choose the seat, then the light. Point the camera at the seat first and look at what is behind it. Avoid a bright window, a bare lamp or a blank white wall. Then put the key light where you want the face lit from.
- Kill every other source. Overhead lights, a floor lamp, a television left on – all of it off. Mixed household light is the number one reason cheap setups look cheap.
- Place the key near the camera axis. Put it about 30 to 45 degrees to one side of the lens and slightly above eye level, then bring it in close. Distance matters more than power: a light close to the subject falls off across the face far more gently than the same light across the room.
- Soften it. Hang the sheet, curtain or paper lantern between the light and the subject, and keep it as close to the fixture as you can. Bigger diffusion relative to distance means softer shadows.
- Fill the shadow side. Prop the white foam board on the opposite side, just below chin height, angled up at the face. Watch the monitor and stop when the shadow side is only slightly darker than the lit side.
- Push the subject away from the background. Moving the chair three to six feet forward darkens whatever is behind them, which separates head and shoulders without buying a second lamp.
- Match the colour. Set the camera white balance to the shot rather than auto. If auto drifts mid-take, lock it on a manual or daylight setting.
- Set exposure by hand. Watch the histogram or the camera’s exposure meter, lock it, and stop it from breathing. On a phone, lock exposure and focus on the face with a long press on the screen.
- Add an edge light last. If the subject still blends into the background, clamp a second light behind and above them, aimed at the back of the head and shoulders, and dim it until it is just visible.
How to Light an Interview with Cheap Gear for a Small Room
Small rooms fight you in three predictable ways: hard reflections, shadows the subject cannot escape, and windows you cannot switch off.
For reflections, you move the subject rather than the camera. Turn them 90 degrees so they are no longer facing a mirror, a window or a glossy cabinet, and reframe. A pale wall behind the camera position can also act as a giant bounce if you need more light on the shadow side.
For shadows, move the key closer to the camera and diffuse it harder. When a light sits almost directly on the lens axis, the nose shadow falls under the nose and becomes far less visible than it does at 45 degrees.
For mixed room light, get the subject away from windows if a window sits beside or behind them. A blown-out window behind the subject is harder to fix than it looks, and moving the chair is faster than any gel.
How to Light an Interview with Cheap Gear for Two People
Two people seated at an angle is the easiest version of this. Have them sit about 45 degrees to each other rather than shoulder to shoulder, and place the key so it covers both faces from the front rather than splitting them down the middle.
Start with one light placed close and slightly high, centred between the two heads. Check the preview: if one face is noticeably darker, rotate the pair slightly toward the light rather than adding a second one.
If the light cannot cover both evenly, a second cheap light on the far side of the pair acts as fill. Keep it dimmer than the key, aim it at the darker face, and turn both to daylight balance so the two sides of frame match.
How to Check and Improve Your Lighting Before Recording
Run this check every time. It takes two minutes and catches most problems before anyone is on record.
- Watch the preview, not the record button. Frame it as if you were shooting, then look at the background. If it is brighter than the face, dim it or move the subject forward.
- Turn on the histogram or exposure meter. Push the lit side close to but not past the right edge. Clipping on skin cannot be recovered in editing.
- Lock exposure and focus on the face. Auto mode will hunt every time a hand moves.
- Set white balance manually. Warm skin tones are fine; skin that changes colour when the subject moves is not.
- Record ten seconds and watch it back. Play it on the camera screen first, then on a phone or TV. Shadows and colour shifts that look acceptable small are obvious on a bigger screen.
Common Mistakes
Pointing the light straight at the subject. Shadows stack under the chin and nose and the face looks flat. Fix: move the light 30 to 45 degrees off the lens axis and raise it slightly.
Leaving ceiling lights on. Your careful key is fighting three colour temperatures at once. Fix: switch off every fixture you did not place deliberately, and add a white card on the shadow side instead.
Mixing warm and cool lights. A warm key with a cool fill patches the face orange and grey. Fix: set both to the same mode, match them in the app or on the panel, and correct any remaining shift in white balance or in post.
Leaving the background too bright. The eye goes to the window, not the face. Fix: move the subject several feet forward, turn off the lamp behind them, or drape something dark over that corner.
Putting the key light too low. Light coming from underneath hollows the eyes. Fix: get the source above eye level, even if that means standing the light on a tall shelf.
Dropping the reflector below the chin. Bounce aimed at the chest gives a chinless, floating look and kills neck definition. Fix: angle the white surface so its top edge sits just under the chin and points up at the face.
Bouncing off a white ceiling. It softens everything, including the background, and often spills into the shot. Fix: keep the bounce close to the subject’s face, not the whole room.
Frequently Asked Questions
Can I light an interview with one cheap light?
Yes, and most working interview setups use exactly one. Put a single softened light 30 to 45 degrees to the side of the camera and slightly above eye level, then bounce a white foam board on the shadow side to soften the contrast. Add a white card, not a second lamp, and most viewers will not notice anything cheap at all.
What is the cheapest way to improve interview lighting?
Turn off the room lights and move the subject away from the wall. Both cost nothing and both change the look more than any purchase. Next cheapest is a white foam board for fill, then a sheet or shower curtain to soften the key. Fixing these four things usually beats saving up for a better light.
Is window light good enough for an interview?
It is often better than an expensive panel. Place the subject facing or at 45 degrees to the window so the light wraps around the face, never with the window directly behind them. Overcast daylight is the flattest, most forgiving source. Watch for direct sun patches and hard window-frame shadows moving across the subject.
How do I avoid harsh shadows with one light?
Move the light closer to the subject and put something between the light and the face: a white sheet, an opaque shower curtain or a paper lantern. The larger the diffusion relative to the distance, the softer the shadow edge. Then fill the remaining shadow with white foam board until it is only slightly darker than the lit side.
Should the background be brighter or darker than the subject?
Slightly darker, and never brighter. A bright background pulls the eye past the face, especially when it is a window. Push the subject three to six feet forward, dim or drape whatever is behind them, and if you need more separation add a dim edge light on the back of the head and shoulders.
How do I make cheap lighting look professional on camera?
Consistency beats price. Lock white balance and exposure so skin tone does not shift mid-answer, match every light to the same colour temperature, and keep one light doing the shaping so the shadow direction never changes. Watch ten seconds of playback on a bigger screen, not just the camera preview, before you call it done.
Conclusion
Start with the setup, not the shopping list. Put one softened light close to the camera, add a white board on the opposite side to lift the shadows, switch off every other light in the room, and record ten seconds to check exposure before your subject arrives.
That build takes about fifteen minutes and covers almost every interview you will shoot. From there, refine it one change at a time through short test clips: move the key a little closer, raise the reflector a little higher, push the subject a little further from the background. Once the look is repeatable, spend money on the next item in the chain rather than on the first thing that looks impressive in a demo.